

To fix the camper awning, use tape to repair the fabric, tighten or replace the hardware, adjust the tension, and realign the arms. Basically, you can fix some sort of camper awning issues, which we will discuss today, with a fixing method, how to fix them.
Not only that, today we are going to describe a Step-by-Step DIY Repair Guide, including Repair vs. Replace, how to prevent future damage, and the difference between professional vs. DIY repair. So, there are lots of things that we will discuss, and you must fix them before a sudden rip or hole ruins your full awning.
Key Takeaways
- You can fix small camper awning fabric issues like Sagging Canvas, Tears and Rips, Mold and Mildew, UV Damage & Brittleness, and fraying edges.
- Professional camper awning fabric repair is better than the DIY process.
- If you are confident in DIY camper awning fabric repair, then do it; otherwise, the damage will cost you more if you make a mistake.
What Common Camper Awning Fabric Problems can be solved by oneself?
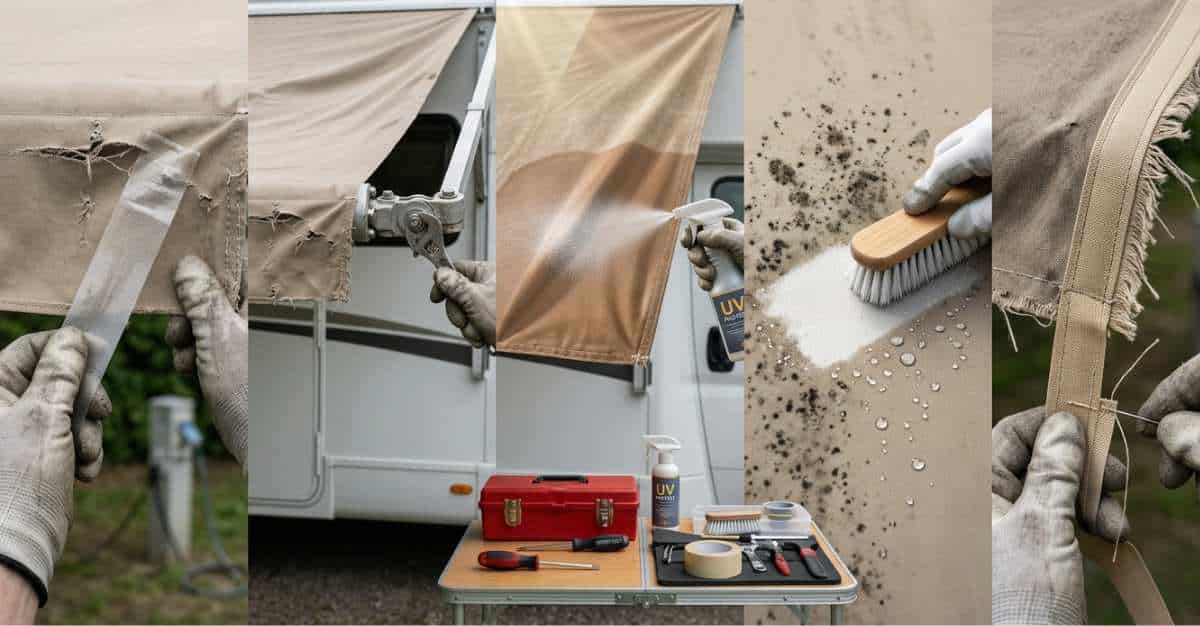
You can fix minor issues in Camper Awning Fabric, such as tears and Rips, Sagging Canvas, UV damage and brittleness, Mold and Mildew, and fraying edges, yourself. However, you can easily solve such issues by following some simple and specific steps, but if the issue is bigger and tougher to solve, then you should call awning repair service providers. So, without any further delay, let’s move deeper now.
Tears and Rips
These issues can happen due to high winds, falling debris, or catching on sharp objects. At first, there might be small tears that can become major issues if not repaired quickly with specialized tape. However, to fix the tears and rips issues, you need to follow the steps that we have discussed, but before that, arrange the following tools first.
Tools You Need
| Category | Tools / Materials |
| Cleaning Tools | Soap & water, sponge/brush, dry cloth, alcohol wipes, ladder |
| Repair Materials | Awning repair tape, vinyl/PVC patches, and repair glue |
| Cutting Tools | Fabric scissors, tape measure, roller/spatula, clips |
| Sewing Tools | Upholstery needle, UV-resistant thread, pliers |
How to fix Tears and Rips in the Camper Awning
- Step 1: First, you need to use a special waterproof awning repair tape with adhesive patches to make sure the tear is secure and air-tight.
- Step 2: You need to use high-quality awning fabric adhesive with a separate seam and let it dry for at least four hours.
- Step 3: For extra strength on fixes, you can sew it for extra strength.
- Step 4: If the damage is beyond your repair skills, you may need to replace the fabric. In that case, you can contact local RV awning service providers like Awning San Diego, who can replace them.
Sagging Canvas
Sagging Canvas is a very common issue that you may find over time. These issues usually happen when the camper awning doesn’t open fully, and water, dirt, and leaves stay on the fabric, causing tension on the fabric. As a matter of fact, day by day, the cloth will start sagging, and a few steps of rv awning fabric repair can save you.
Tools you required
| Category | Item |
| Repair | Repair Tape / Kit, Fabric Adhesive, Sewing Awl & Thread |
| Cleaning | Soap, Brush, Alcohol / Acetone |
| Adjustment | Socket / Drill, Pliers, Pins |
| Reinforcement | Canvas Patch, Seam Sealer, Support Poles |
How to repair a camper awning fabric sagging canvas?
- Step 1: At first, clean the awning with soap & lukewarm water completely and then dry it completely.
- Step 2: Inspect the damage carefully for tears, stretched areas, and broken seams.
- Step 3: Now, you need to adjust the tension, and for that, you have to tighten the tension spring in the roller tube.
- Step 4: You need to adjust the angle of the awning arm to create a slope and prevent water from gathering at the centre.
- Step 5: After fixing it properly, you can use an awning support pole or an awning flapper stopper to hold the fabric taut in the middle.
UV Damage & Brittleness
This is one of the main causes of camper awning fabric damage in San Diego, as most of the year here is hot and humid, and according to LUFT TIME, the average UV index in San Diego is about 5.1 UV. So, this can damage your camper awning fabric faster.
Over time, due to sun exposure and photodegradation, UV rays break down the polymers, which makes the materials weak and damages the awning fabric. But these issues can be solved by following a few steps. First, let’s identify the tools you need to fix them.
Tools you need
| Category | Tools / Materials |
| Cleaning & Prep | Soap/awning cleaner, soft brush/sponge, rubbing alcohol, ladder, microfiber cloths |
| Repair Tears & Holes | Awning tape, vinyl liquid patch, fabric/vinyl patches, thread & needle, scissors/knife, optional heat gun |
| UV Protection | UV spray, applicator pads/cloths |
How to fix UV Damage & Brittleness issues in camper awning fabric repair?
- Step 1: First, you need to clean the awning fabric with soap to remove all types of dirt and salt that speed up UV damage. After that, dry it completely to take it to the next stage.
- Step 2: After that, if there is any small crack or weak spot, then fix it immediately
- Step 3: Now, it’s time to apply UV protection spray, which will restore the flexibility and slow down future sun damage.
- Step 4: UV Damage can happen at any time. In that case, to save it from harsh UV damage, always retract the awning when it’s not in use.
Mold and Mildew
These issues happen due to retracting the awning with moisture, rolling it up with debris, high humidity and temperature, and breakdown of protective coatings. However, this issue can be fixed in simple ways. Before that, let’s identify the tools you need to repair it.
Tools needed
| Category | Tools / Materials |
| Cleaning Tools | Soft brush/mop, garden hose, spray bottle, step ladder, microfiber cloths, optional magic eraser |
| Cleaning Solutions | Commercial awning cleaner, mild soap & water, bleach/vinegar mix, hydrogen peroxide |
| Protection & Prevention | UV protectant/sealant, silicone lubricant, awning hanger/gutter, draft skirt/screen |
How to fix Mold and Mildew issues in camper awning fabric repair?
- Step 1: First, you have to clean the cloth with a brush, mild soap, and warm water. For tough stains, you can use RV awning cleaner or a vinegar-water mix.
- Step 2: After removing Mold and mildew, check for cracks, pinholes, and tears. In that case, you can use RV awning repair tape for small holes, and for larger holes, use vinyl or fabric patches.
- Step 3: Now apply UV and water repellent protectant to prevent all future mold, mildew, and sun damage.
Fraying Edges
In San Diego, fraying edges occur due to sun exposure, wind stress, water and moisture damage, mechanical damage, aging, and other factors. Though sometimes these issues might get bigger, at that time you should call someone like Awnings San Diego. However, if the issue is small, then you can follow the steps below to fix it.
Tools you need to fix Fraying Edges in the awning:
| Category | Items and Purposes |
| Essential Repair & Cutting Tools | Sharp Scissors or Utility Knife, Measuring Tape, Needle and Heavy-Duty Thread (or Sewing Awl), Use UV-resistant thread, Curved Upholstery Needle, Needle-nose Pliers, Heat Gun (Low Setting) |
| Materials for Protection and Reinforcement | RV Awning Repair Tape/Patch Kit, Fabric Sealant (e.g., Sikaflex), UV Protectant Spray |
| Cleaning and Preparation | Soft-Bristled Brush, Mild Soap and Water, Isopropyl Rubbing Alcohol, Ladder |
| Preventive Maintenance | Awning Tie-Down Kit, Lubricant Spray |
How to fix Fraying Edges in an awning?
- Step 1: First, clean the fabric, then dry it completely. After that, trim the Frayed Edges to make the area clean and smooth.
- Step 2: Now use RV Awning Repair Tape, Adhesive Patches, and Seam Sealer/Vinyl Glue to repair the space. However, if the issues are much bigger, you can sew them.
- Step 3: For future maintenance, use a UV-protectant spray, clean them properly, and retract them on time in an emergency.
Seam Separation
Due to UV degradation, constant tension, aging/weathering, thread failure, Material Fatigue, and improper installation, these issues happened the most. This issue can be easily handled with some basic tools and equipment, but don’t forget to follow the steps we will mention.
What tools are required to fix Awning Seam Separation?
| Category | Items and Purposes |
| Cleaning and Preparation Tools | Ladder, Soft-bristled brush or Cloth, Mild Soap/Cleaner, Rubbing Alcohol (Optional), Scissors or Utility Knife |
| For Adhesive/Patching Method (Best for quick fixes) | RV Awning Repair Tape, Awning Fabric Adhesive/Glue, Clamps or Alligator Clips, Roller or Spoon |
| For Sewing Method (Best for long-term repair) | Speedy Stitcher Sewing Awl or Heavy-Duty Needle, UV-Resistant Thread, Needle-Nose Pliers, Seam Sealer |
| For Hardware/Structural Separation | Screwdriver or Drill with Hex Bit, Replacement Screws/Hardware |
How to fix the Camper awning fabric seam?
- Step 1: First, clean the space properly with soap and make sure it is dry. After finishing this process, apply awning seam repair or water-resistant sealant to fix them properly.
- Step 2: After fixing the seam, apply pressure to stick it tight, then let it dry for 4-24 hours. For extra strength when fixing, you can sew it.
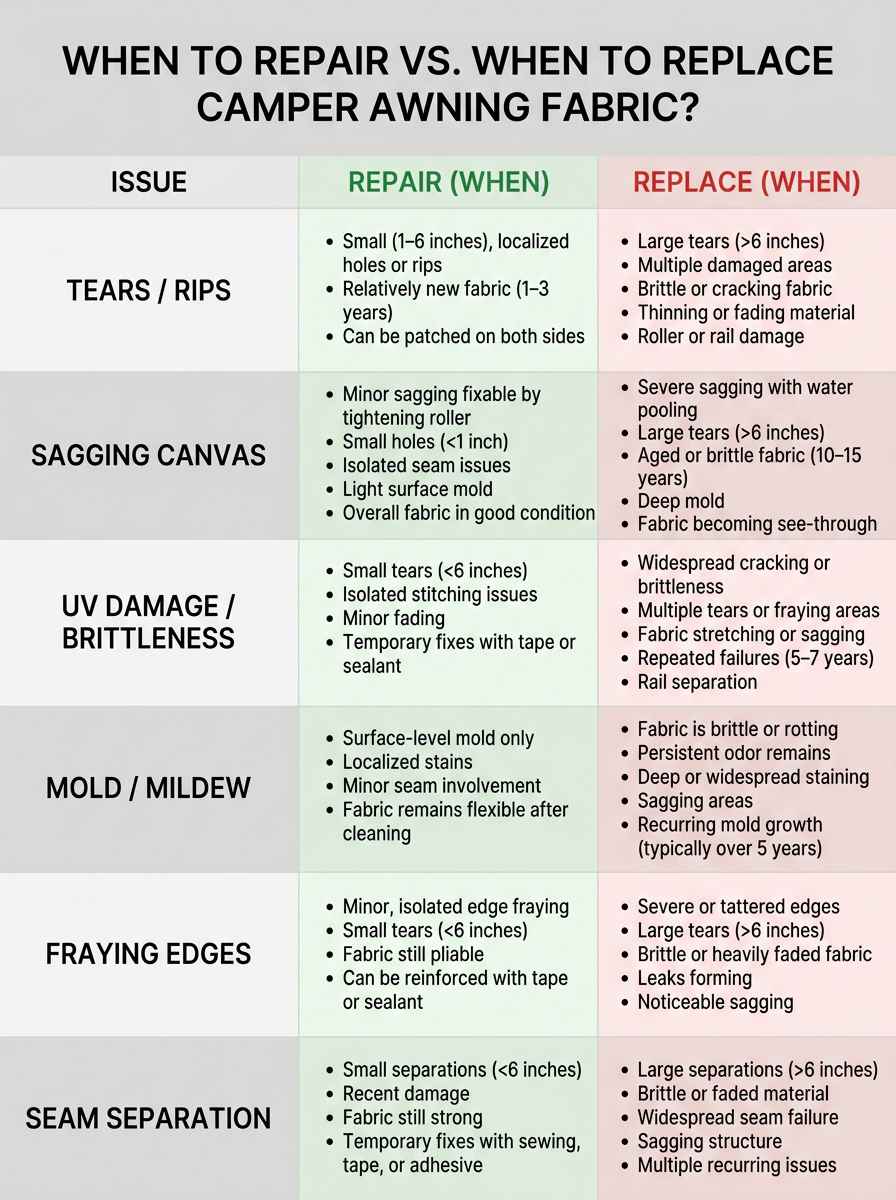
When to Repair vs. When to Replace Camper Awning Fabric?
In one sentence, if you face any minor issues with Tears & Rips, Sagging Canvas, UV Damage & Brittleness, Mold and Mildew, Fraying Edges, or Seam Separation, you can repair them; but if the issues are bigger, you need to replace the RV Awning Fabric. So, how can you find out this? It’s very easy, just remember the signs below.
| Issue | Repair (When) | Replace (When) |
| Tears/Rips | Small (<1-6″), localized holes/rips, young fabric (1-3 yrs), patch both sides . | Large (>6″), multiple tears, brittle/cracking, thinning/fading, roller/rail damage. |
| Sagging Canvas | Minor sagging (tighten roller), small holes (<1″), isolated seams, surface mold, good condition. | Severe sagging/water pooling, large tears (>6″), aged/brittle (10-15 yrs), deep mold, see-through fabric. |
| UV Damage/Brittleness | Small tears (<6″), isolated stitching, minor fading, temporary tape fixes. | Widespread cracking/brittleness, multiple tears/fraying, stretching/sagging, repeated failures (5-7 yrs), rail separation. |
| Mold/Mildew | Surface-only mold, localized stains, minor seams, flexible fabric post-clean. | Brittle/rotten, persistent odor, deep stains, sagging, recurring growth (>5 yrs). |
| Fraying Edges | Minor, isolated edges, small tears (<6″), pliable fabric, use tape/sealant. | Severe/tattered, large tears (>6″), brittle/faded, leaks, significant sagging. |
| Seam Separation | Small (<6″), recent, strong fabric, sew/tape/glue temporarily. | Large (>6″), brittle/fading, widespread damage, sagging, multiple failures. |
Note: These measurements or signs might be confusing for you. In that case, you can call someone like Awning San Diego, who can repair or replace them without any hassle.
How to Protect Your Awning from Future Damage?
To protect your awning from future damage, you should retract it during bad weather, adjust the pitch properly, clean it properly, and use the right UV materials to protect it from the sun. If you properly maintain the following points, then your awning may last more than 8-20 years, depending on your Awning type.
But remember one thing: don’t be overpossessive about cleaning, otherwise it may damage it fully. Now, follow the list below and save your awning for a long time.
- Clean the Awning gently: You should clean the awning gently with harsh-free soap and materials. But remember again that you shouldn’t overwash it and never retract it before drying it properly.
- Retract the tire on 20-25 mph: Strong winds are very common in San Diego. So, you should avoid using the awning during heavy rain and wind
- Add lubricant and sprays: In all types of moving parts and clothes, apply lubricant and UV-protectant spray to run all the awning parts smoothly.
- Use advanced weather Sensors: You should use advanced weather sensors and inspect the hardware often to make sure it’s running properly.
Note: This is a DIY process, and you just need to make sure that you know the process perfectly; otherwise, take expert assistance like Awning San Diego
Professional Repair Services vs. DIY: Which awning service is better?
Without any doubt, professional repair service is better because of their expertise, experience, materials, tools, and quality of service, but for small issues, you can do it yourself if you are confident. But the discussion is not over yet. Take a look at the table below and know the difference between Professional awning Repair Services vs. DIY.
| Aspect | Professional Repair Services | DIY Repairs |
| Best For | Large tears (>6″), motors, frames, structural | Small tears (<6″), cleaning, fraying |
| Warranty | Included (protects manufacturer coverage) | None (may void warranties) |
| Time | Hours–days (shop scheduling) | Hours–days (your schedule) |
| Risk | Low (expert handling, no errors) | High (damage, injury, failures) |
| Lifespan | 8–20 years (durable results) | Temporary (1–3 years max) |
| Cost | $250–$1,800 (avg. $670 incl. labor/parts) | $25–$95 (materials like tape/kit) |
FAQs
How much does it cost to repair an awning?
An awning repair may cost around $260-$1800 on average, $700 if you do it through professionals. But for minor repairs, you can do it yourself, which may cost around $25-$95.
Can you sew a ripped awning?
Yes, you can sew a ripped awning. This way, you can easily repair snags and add a patch for extra strength.
How long should a camper awning last?
Well, it totally depends on your maintenance level, but on average, between 5 and 15 years. As I said earlier, if you maintain this well, then it will last longer.
Think twice before making a decision
You can do some simple camper awning fabric repair by yourself, but it requires following some specific guidelines which we already mentioned, and we are confident that you can do it. Look, we never encourage doing this if you feel low in confidence, because if it somehow gets worse, it will cost more. So, before taking any final call, think about it again. If required, you can call us, and we will assist you in making a decision.