

Remove a metal awning by first clearing the area and, if needed, cutting power. Take off panels, support the frame, then loosen bolts from the outer brackets inward. Detach the frame, lower it safely, remove wall hardware, and patch all holes.
Old metal awnings tell a story. Ours went up in the 1980s and shaded two generations. But rust moves fast, and one good storm later, it was leaning in a way that made us nervous. If yours is doing the same or you simply want a cleaner look, you’re in the right place.
We’ve helped many homeowners here in San Diego take down metal awnings of all kinds, including small aluminum window units, large porch covers, and even older steel canopy systems. We guide you through the whole process. Also, keep it real, keep it safe, and we won’t waste your time.
Safety Precautions Before You Start
Stop before you touch anything. Check the awning, weight, and wall support first. Never DIY damaged, oversized, or second-storey awnings alone, most removals require at least two people for safe handling. Most injuries happen here, not during removal.
Weight and Structure Warning
Metal awnings are heavy. A small aluminum window awning can weigh 40 pounds. A large steel porch cover can weigh 200 pounds. Either one falling on you causes serious harm.
Before you start, look at how your awning sits on the wall. Check for gaps between the frame and the wall. Check for cracks in the stucco or siding near the bolts. If anything looks uneven or pulled away, the structure has shifted. That is not a DIY job anymore.
When NOT to Do It Yourself
Call a professional if any of these apply to your awning:
- It is wider than 8 feet.
- It sits above a second-floor window.
- The wall around it has cracks.
- There are wires running into the frame. You cannot see how it is bolted in.
Guessing costs more than calling someone. A contractor can assess it in 20 minutes.
Solo or Team?
You need at least one helper. No exceptions. Even a small awning is awkward to handle with one hand while on a ladder. Your helper holds the frame steady while you remove the bolts. For anything wider than 6 feet, bring two helpers. One person on each end, and you work the bolts in the middle. This is not about strength. It is about control.
Tools and Equipment You’ll Need
You don’t need a truck full of tools. Most of this is already in your garage.
- Power Drill + Bits: For fast removal of lag screws and bolts.
- Socket Set & Ratchet: For hex-head bolts on the frame and brackets.
- Pry Bar: To dislodge the wall fin and any caulked sections.
- Stable Ladder or Scaffold: A scaffold is safer for wider awnings.
- Utility Knife: To cleanly cut through old caulk seals.
- Penetrating Oil (WD-40): For rusted bolts. Apply 15 min before you start.
- Stucco Patch / Wood Filler: To seal the anchor holes when you’re done.
- Safety Glasses & Work Gloves: Non-negotiable. Metal edges are sharp.
- Small Container or Bag: To collect screws and bolts so they don’t roll away.
Pro Tip on Rusted Bolts
Spray penetrating oil on every visible bolt the night before. In the morning, they’ll turn much more easily. For bolts that still won’t budge, use an impact driver, not more torque on a manual tool. Forcing a seized bolt with a hand ratchet risks snapping it off inside the wall. A snapped bolt means drilling it out, which takes longer.
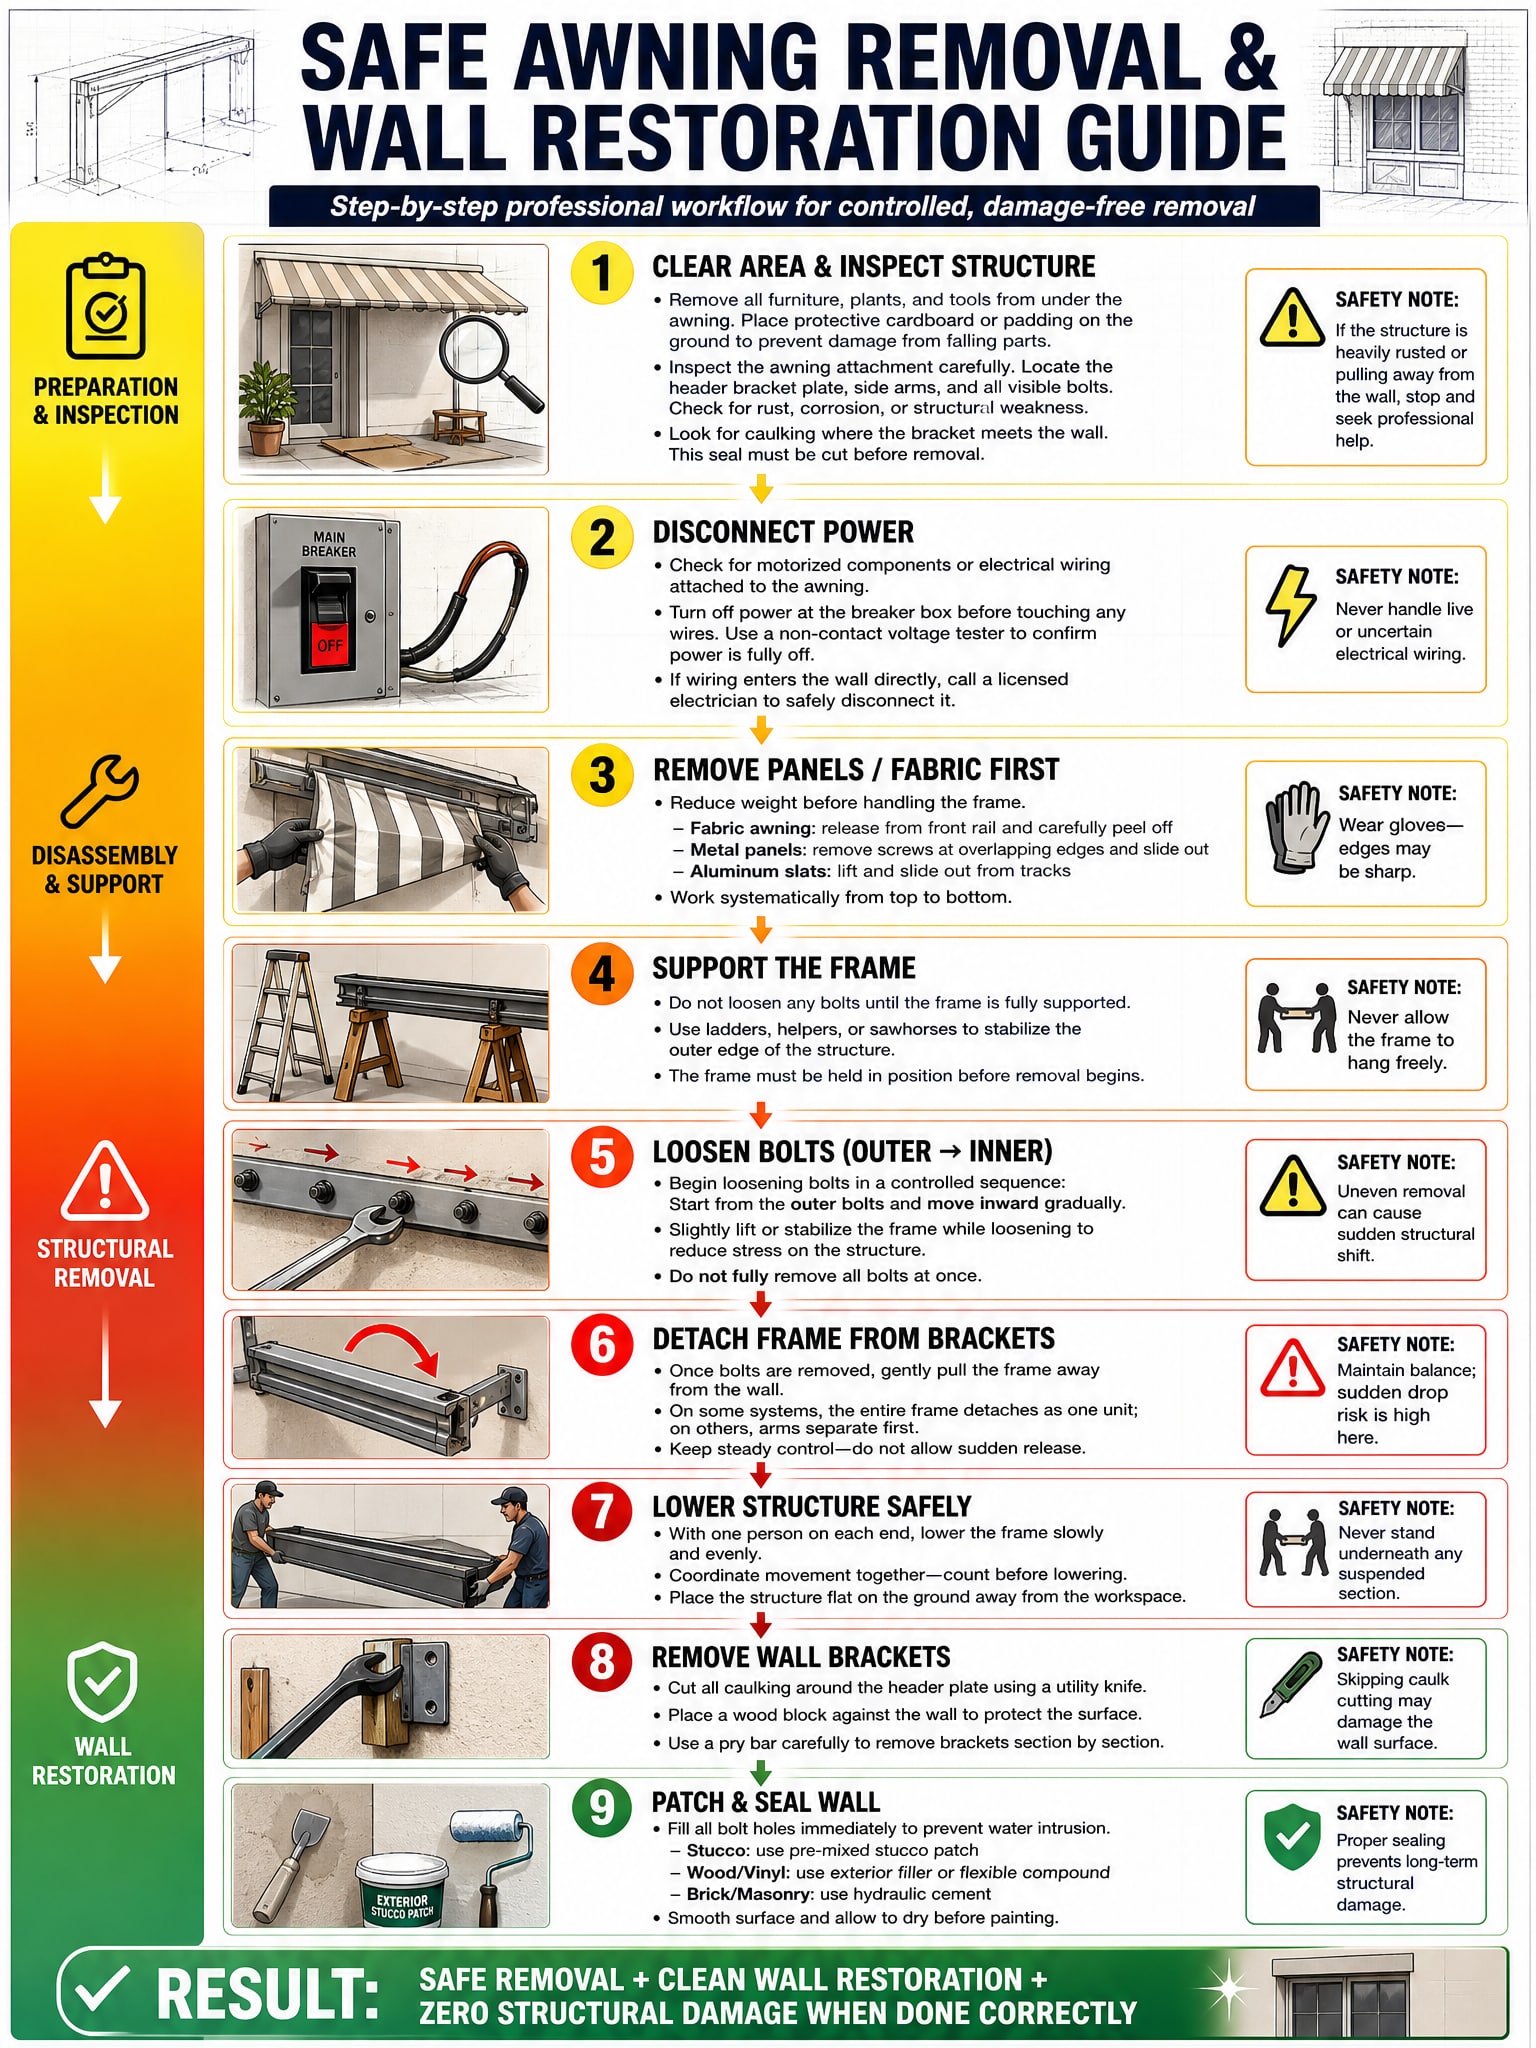
How to Remove a Metal Awning: Safe 9-Step Guide
To remove a metal awning:
- Clear the area and inspect how the awning is attached
- Disconnect any power if there’s wiring
- Remove fabric, panels, or slats first
- Support the structure with a helper or brace
- Loosen fasteners from the outer edge inward
- Detach the frame from the wall brackets
- Lower each section carefully with a helper
- Remove wall brackets and leftover hardware
- Patch bolt holes and seal the wall
Full details for each step are below. Reading them before you start the sequence matters.
Step 1: Clear the Area and Inspect the Structure
Move everything out from under the awning. Chairs, pots, tools, clear it all. Lay cardboard flat on the patio below. It protects the surface when metal pieces come down.
Now look at the wall. You will see a flat plate running across the top. That is the header bracket. Below it, arms bolt into the wall on both sides. Count the bolts. Check if the caulk runs along the top edge where the plate meets the wall. That caulk bonds the plate to the wall. You will need to cut it before you pry.
Look for rust on the brackets and cracks near the bolts. If anything looks like it is pulling away from the wall, stop and call a professional before going further.
Step 2: Disconnect Power if Needed
Check the frame before you touch it. Look for a wall switch, a motor at one end, or wires running along the frame.
If you see wires, go to your breaker box and turn off that circuit. Come back with a non-contact voltage tester. Hold it near the wire. Silence means safe. Beep means power is still on.
If wires disappear into the wall, call an electrician to cap them. Do not tape loose wire ends and move on. That is a fire risk.
Step 3: Remove Fabric, Panels, or Slats First
Strip the awning down before you move the frame. Less weight means safer work. For aluminum slats, lift each one up slightly and pull it toward you. It slides out of the side tracks. Work top to bottom.
For corrugated metal panels, find the screws at the overlapping edges. Remove them and slide each panel out. Keep gloves on. The edges are cut.
For fabric covers, find where the fabric tucks into the front rail channel. Free that edge first. Then peel the fabric off the frame. A bare frame is much lighter and easier to handle.
Step 4: Support the Frame Before You Touch Any Bolts
Do not loosen anything until the frame is supported. Have your helper hold the outer edge of the frame. For a wider awning, rest that outer edge on a sawhorse before your helper gets in position.
Once the bolts come out, gravity takes over. Your helper’s job is to guide the frame down slowly. Not catch it. Guide it.
Step 5: Remove Bolts in the Right Order
Lift the frame slightly upward. Pull it straight toward you. It slides off the bracket hooks. Your helper takes the weight as you guide it clear.
On older awnings, the frame and header plate come off as one piece. On newer systems, the arms detach from the header separately. Either way, lower each piece to the ground. Do not drop it.
Step 7: Lower Each Section Carefully
For a small awning, one person on each end. Count together, then lower it at the same pace. Set it flat on the ground away from your work area.
For a large porch cover, take it apart in sections. Remove one beam at a time. Two people hold each beam while the bolts come out. Set it down before moving to the next one. Nobody stands underneath a section that is coming down. Keep helpers to the side. Always.
Step 8: Remove the Wall Brackets
Look at what is left on the wall. You will see the header plate at the top and the side bracket mounts on each side. If caulk runs along the edge of the header plate, cut through it with a utility knife first. The full length of the seam. If you pry without cutting, the caulk pulls chunks of your wall off with it.
Hold a piece of scrap wood flat against the wall just above the plate. Put your pry bar against that wood block and lever upward. The block protects your wall. Work gradually from one end to the other. It comes off cleanly.
Step 9: Patch and Seal the Wall
Fill every bolt hole today. Open holes let water into the wall. Water causes rot. Rot costs far more to fix than a tube of patching compound. For stucco, use pre-mixed stucco patch. Push it into the hole, overfill slightly, and smooth flat. Sand and paint once dry.
For wood or vinyl siding, use exterior wood filler. On vinyl, auto-body patching compound works better. It stays flexible through temperature changes and does not crack. And for brick or masonry, use hydraulic cement. It expands as it sets and fills uneven anchor holes better than anything else.
Scrub leftover caulk residue with a wire brush. Wipe the wall down with a damp rag. If the awning sat there for years, you would see a shadow on the wall where it blocked the sun. A fresh coat of exterior paint fixes that.
What to Do After Removing the Awning
After removing an awning, patch and seal wall holes, remove leftover hardware, handle electrical safely, inspect surfaces, recycle metal parts, and repaint or prepare the area for a new installation.
After the awning is down. Now you need to handle what’s left, including the wall, hardware, and the metal itself.
Fixed Metal Awning: Patch every bolt hole in the wall. Seal them with the right filler for your wall type. Then repaint the exposed area. If you plan to install a new awning, check now whether it uses the same anchor points.
Retractable Metal Awning: Turn off the circuit at your breaker box first. Then remove the motor housing. Have someone help you lower the bracket channels- it is heavier than they look. Get an electrician to cap the wires properly inside the wall.
Window or Door Awning: These are small and easy to handle after removal. Just know that your window will now get more direct sun. A solar shade or exterior shutter is a simple, low-cost fix for that.
Porch Cover or Patio Canopy: Check the concrete after the frame comes down. Look for anchor base plates or footing bolts left in the ground. Pull them out or grind them flush. Fill the holes with hydraulic cement.
Scrap and Disposal: Aluminum goes to a scrap metal yard. Most yards will pick it up for free because the metal has value to them. Steel is worth less per pound but is still recyclable. Call your local yard before you haul anything. Landfill is the last option.
Reinstall or Reuse: If the frame came off clean and undamaged, you can reinstall it or donate it. Before storing, check every weld and bracket. Bag all the hardware together and label it. You will thank yourself later.
DIY vs Hiring a Professional
Some removals are straightforward weekend jobs. Others should not be touched without professional help. Here’s how to read the difference.
| Situation | DIY? | Pro Recommended? | Est. Pro Cost (San Diego, USA) |
| Small window awning, ground floor, no rust | Yes | Optional | $150-$300 (basic removal/install) |
| Porch or patio cover under 10 ft wide | Maybe | If no helper is available | $300-$550 (1-2 hours on‑site work + ladder + light tools) |
| Large awning over 10 ft, second story | No | Strongly yes | $500-$900 (extra height, safety, extra labor) |
| Awning with electrical wiring/motor | No | Yes, an electrician is required | $400-$800+ (awning removal plus electrician call‑out) |
| Heavily rusted, structurally damaged awning | No | Yes, safety risk | $400-$800 (extra time, rust work, safety checks) |
| Attached to stucco or masonry, complex anchors | Maybe | Recommended | $350-$700 (special anchors, patching, care of surface) |
| Bolted into brick with no visible anchors | No | Yes, structural assessment needed | $500-$1,000 (wall‑assessment, extra care, longer time) |
Note: these are approximate metal costs. It may vary depending on the situation, demand, and the complexity of the work.
When to Call a Professional
Second story or higher (second floor, third floor, or above)? Call a professional. Large or heavy awning? Call a professional. Electrical wiring in the frame? Call a licensed electrician. Bent frame, cracked wall, or sheared bolts? Do not touch it yourself.
In San Diego, a licensed contractor or awning specialist charges $40 to $100 per hour. Most removals take one to three hours. That cost is nothing compared to a wall repair or an injury. Get a Free Removal Quote in San Diego →
Common Mistakes to Avoid
We have seen all of these. A few cost an hour. Some cost a full weekend and a repair bill.
- Remove the header plate last. The side arms and brackets come off first. The header holds the full weight of the frame.
- Spray rusted bolts before you turn them. A forced bolt snaps inside the wall. Apply penetrating oil, wait 15 minutes, then try.
- Never work alone on a ladder. The ladder shifts. The frame swings. You need someone holding both steady.
- Cut the caulk before you pull. Most awnings are sealed to the wall. Pull without cutting, and you take the stucco with it.
- Patch bolt holes the same day. Open holes let moisture into your wall. In San Diego, that damage adds up fast.
- Lower every section by hand. A dropped metal panel from six feet can crack pavers or hurt someone. Control the descent every time.
- Check for electricity before you touch the frame. Retractable awnings often have a motor or lights wired inside. Turn off the circuit at the breaker first.
FAQs
Do I need planning permission to remove a metal awning in San Diego?
No permit needed for residential removal. Call San Diego Development Services only if the awning is part of a permitted structure or the property is commercial.
Can removing a metal awning damage the exterior wall?
Only if you force it. Cut the caulk first, back out the screws properly, and patch the holes the same day. Done right, the wall framing stays untouched.
What is the safest way to handle a heavy or oversized awning?
Remove the panels first to reduce weight. Lower each section with two people. For anything large or high up, use a scaffold or hire a professional.
How do I deal with rusted or seized bolts?
Soak in penetrating oil, wait 15 minutes, then use an impact driver. Still stuck, apply heat with a heat gun. Last option, cut with an angle grinder and patch the hole.
Is it safe to remove a metal awning alone?
No. You need at least one helper any time a ladder is involved. You cannot manage the frame, the bolts, and your balance at the same time.
How long does it take to remove a metal awning?
A small window awning takes 30 to 60 minutes. A porch awning takes one to three hours. A large or rusted awning can take a full day to clean up.
Can I reuse a metal awning after removing it?
Yes, if the frame comes off clean with no bends or cracks. Check every weld and bracket. Use new screws and fresh sealant when reinstalling.
What are the disposal options?
Take it to a scrap yard. Most pick up aluminum and steel for free. List a working awning online before hauling it anywhere. Landfill is the last option.
Ready to Remove Your Metal Awning?
Removing a metal awning is manageable when you follow the right order, use the right tools, and bring a helper. Work safely, patch the wall after, and you will protect your home from damage and extra costs.
Our Awning San Diego team removes metal awnings quickly, cleanly, and without damaging walls. Spots fill up quickly, especially in spring. Call us today and get a free same-day quote.