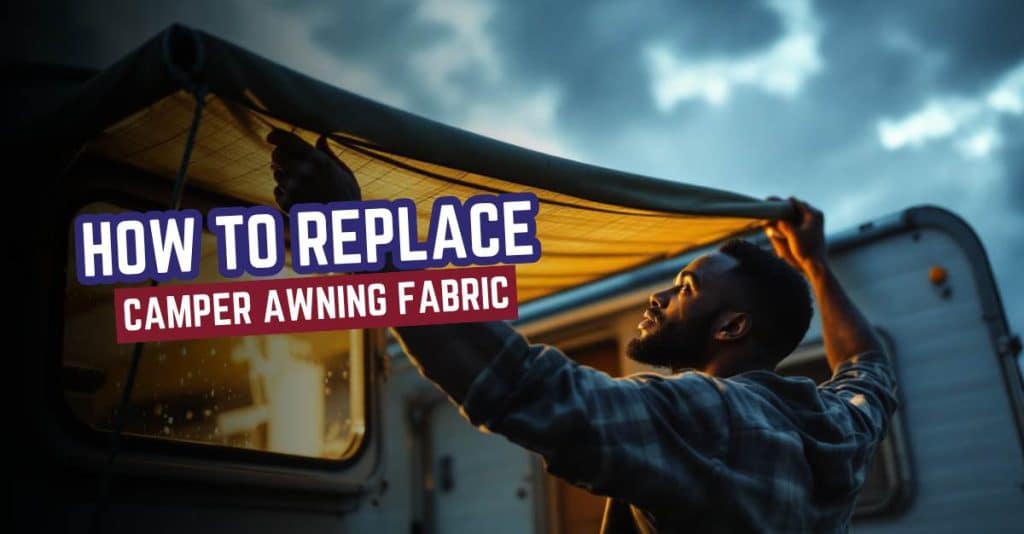
The time has arrived to replace one of the RV awnings, as the fabric is worn out, torn, or drooping down the side. It has been around seven months since the fabric began rolling and unrolling. Besides exposure to harsh sunlight, rain, wind, etc., the situation has reached a point where it must break.
Well, you only need to grab a friend, a few materials, and tools, and you will perform this easy do-it-yourself task without any effort. Professional service charges in the USA may reach $300 to $4000 by 2024, so doing it yourself costs nothing.
Besides, developing skills that will help you use them well, such as maintaining a camper, is excellent. If you follow our detailed guide, you can replace your awning fabric in a couple of hours. Let’s learn how to replace camper awning fabric.
Why Is Replacing Camper Awning Fabric Essential for Every RV Owner?

To ensure the proper functioning of the RV, caring for its appearance and replacing worn-out camper awning cloths are imperative. It is common for an awning’s fabric to weaken, tear, or become discolored after exposure to vigorous UV, harsh weather, and usage, rendering it ineffective for its intended purpose of shade creation and protection. Other components of a camper awning, such as the roller tube and arms, can also get damaged because of the fabric, which may include expensive repairs. They are inexpensive but adequate, improving the camper’s appearance, making it more user-friendly, and keeping the RV owner in touch with nature while on a journey.
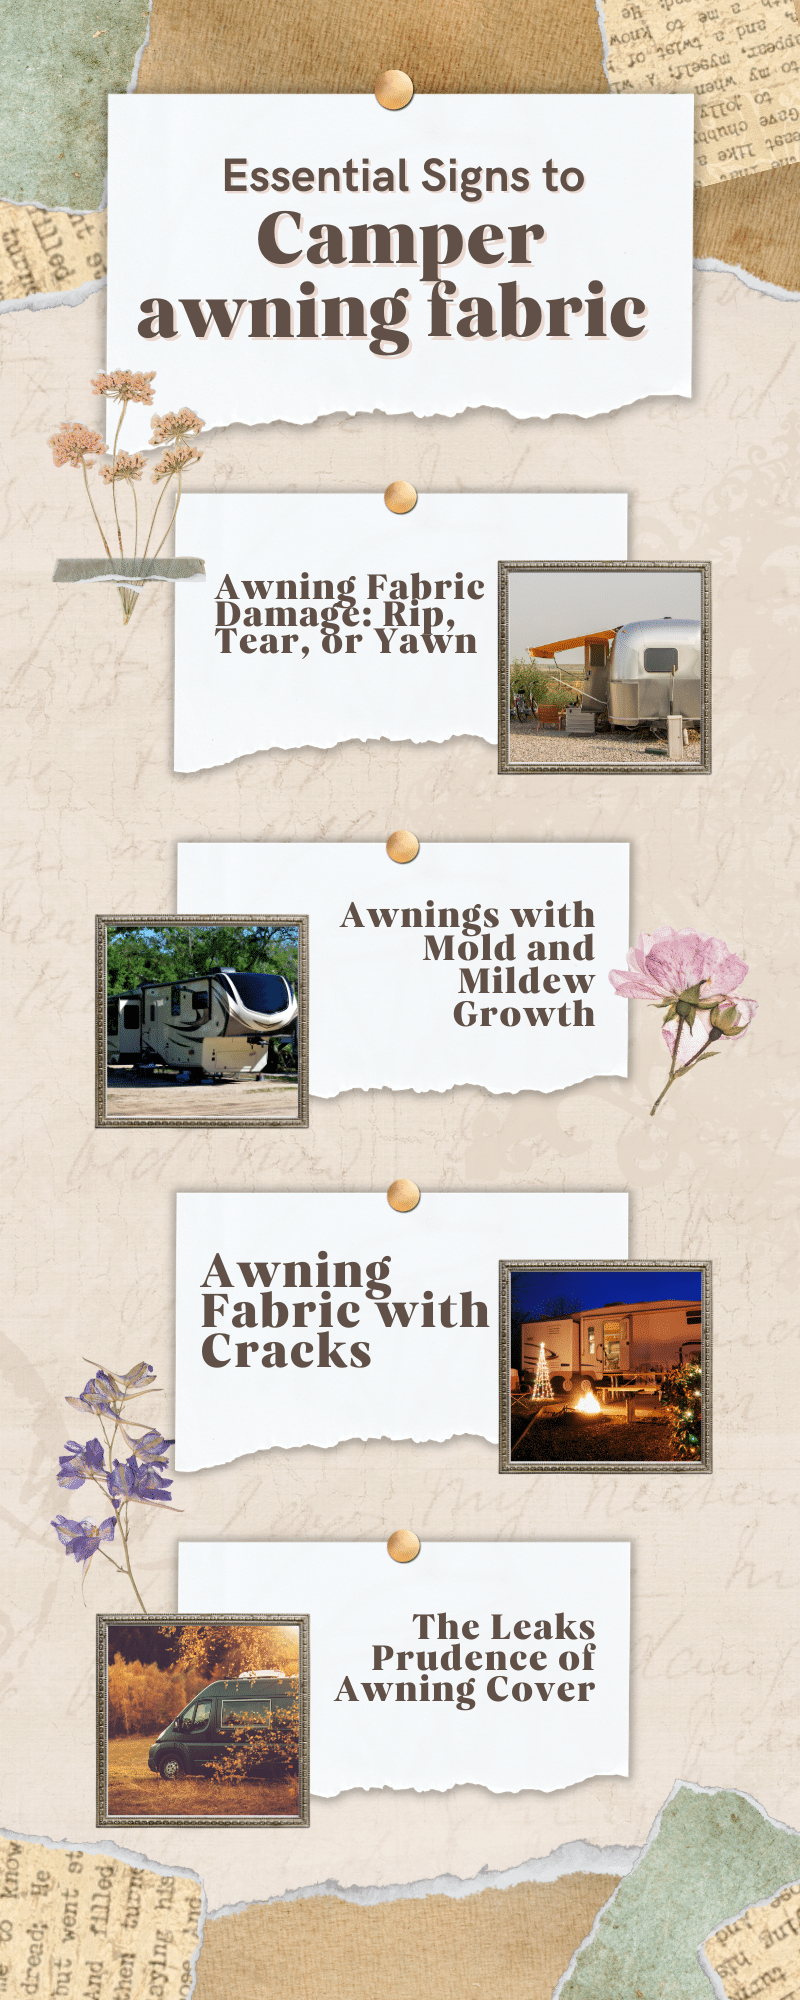
Essential Signs to Replace Your Camper awning fabric
An awning is the perfect accessory to keep you dry and shaded during your camping trips, but even the most durable awning fabric has to be replaced sooner or later. However, what is the right time to do that? What’s the timeframe for replacing your camper’s awning fabric? Here’s you find out:
Awning Fabric Damage: Rip, Tear, or Yawn
When an awning stops accomplishing its purpose of shading from the sun, that is the most critical sign that there is a need to recover the awning.
Awning with tears or rips will not only have an unappealing look, but your awning will no longer serve its intended purpose of shading.
If your awning fabric is torn and no longer effectively protects your patio against the weather, you should continue to focus on replacing it.
Awnings with Mold and Mildew Growth
There is only one place like home except an RV. However, your love for the RV does not mean it is safe from mold and mildew. RV awnings are easily susceptible to mold and mildew development.
Some RV awnings are more affected as they are made from two pieces of fabric sewn together. No matter how much scrubbing you do, mold and mildew appear stubborn and resistant to removal.
Mold is also dangerous to health, so whenever you set off on a new trip, it is wise to change the awning fabric for your safety and that of others.
Awning Fabric with Cracks
Awnings provide shade, but their utility continues beyond that. They complement the aesthetics of your house. Over time, however, the fabric on an awning will accumulate marks, and sometimes, these marks must be retained.
Most want to avoid taking the time to do it, but if the shaded spot becomes more of a problem than a solution. It could be time to replace the fabric on the awning.
The Leaks Prudence of Awning Cover
Dry rot is also applicable in this scenario. Sunlight, heat, rain, and snow damage the fabric, altering its appearance and may even cause the awning to break.
The fabric will not withstand this for long. When this situation occurs, the organic structure of the fabric becomes weak and needs to be replaced long before such vital steps are required.
Faded Awning Colors
Apart from the usual things, UV rays are bad for almost anything, including fabrics used for awnings. If the previous color is dull and lifeless, it may be a sign that it’s time to replace the fabric.
Your Awning is Hangin’ Down
Over time, the tightening of awnings might not be as effective as it once was, so the stretching of the awning might be ineffective. The fabric must be updated if your Aston is drooping and standing proud.
This may appear to be insignificant here. However, vegetation may accrue under a droopy awning and create significant problems.
Your Awning Age
Last but not least, the Age of the awning fabric is one of the main points that one should consider when considering changing it.
No awning fabric is eternal, no matter how high its quality. The average duration of the top-quality awning fabric is around:
For normal fabrics, the rate is 5-8 years, and for cheaper fabrics, it is 7–12 years. For expensive-grade fabrics, its lifespan is between 12 to 15 years.
If you pay close attention to these signs, you can be sure your camper will have a new, functional awning to enjoy on its next trip without the hassles of broken fabric. Replacing the fabric on your awning allows you to improve its efficiency and have more fun on your camping trips.
How to Replace a Camper Awning Fabric: Step-by-Step Guide
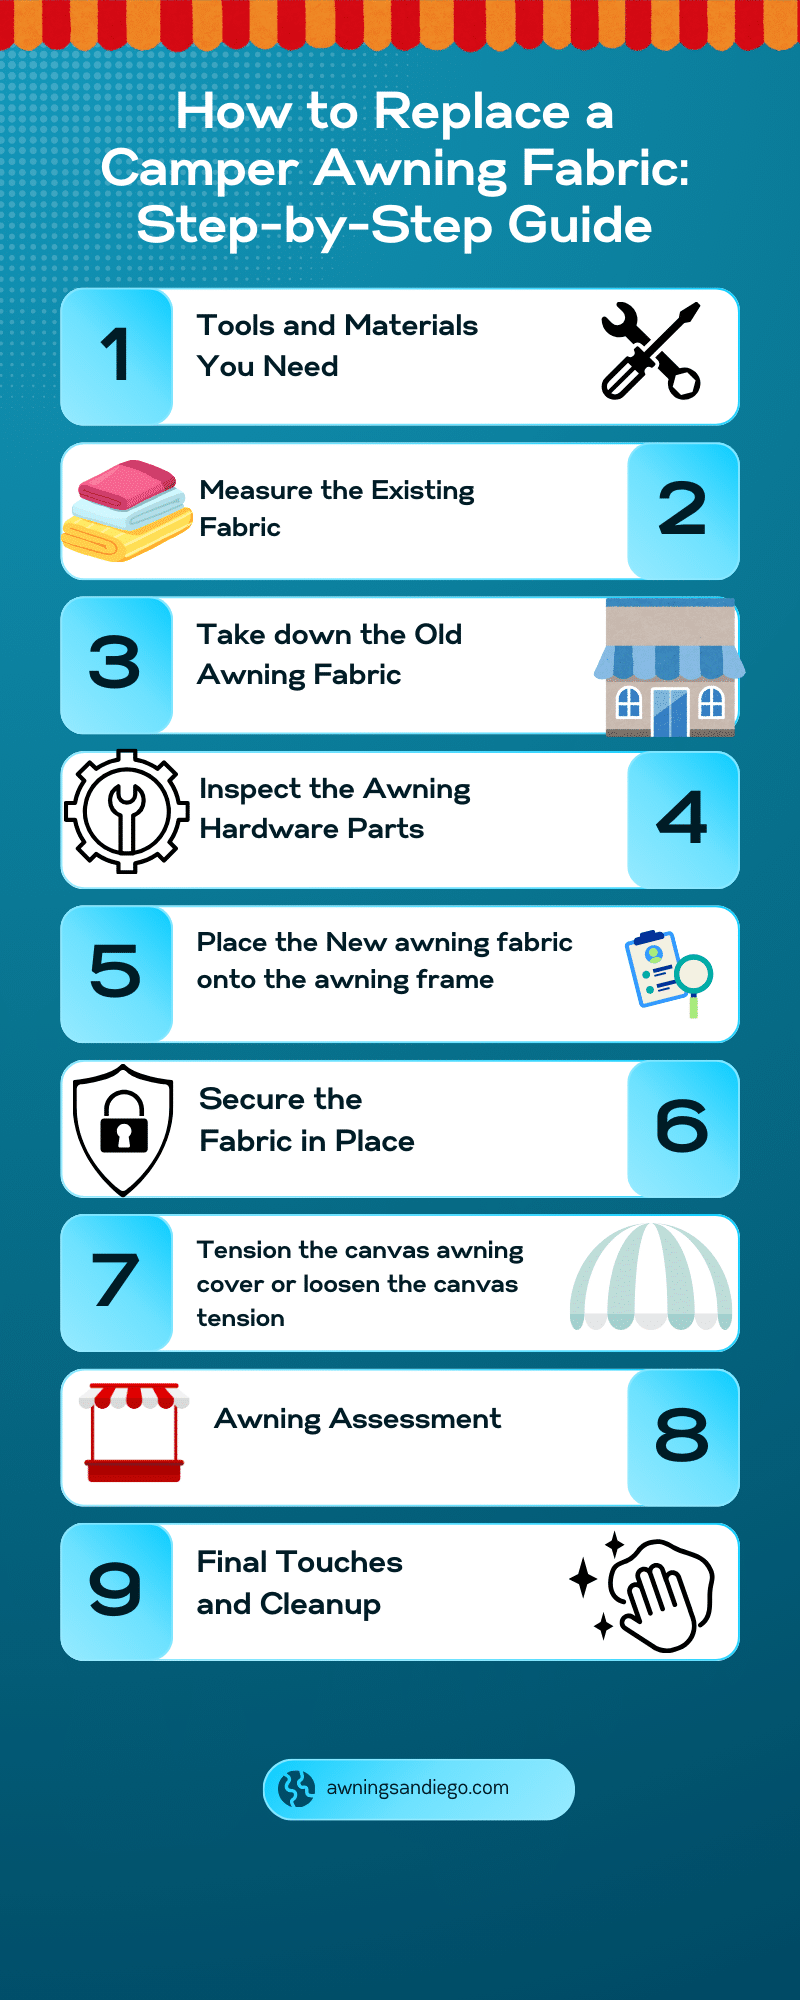
If you want a simple, affordable improvement that will keep you and your family cool and comfortable on your next camping trip, consider changing the fabric of your camper awning. In just nine steps, learn how to change the fabric on your camper awning easily.
Step 1: Tools and Materials You Need
Before jumping to the steps, it’s essential to list the tools and materials that are required first and bring them all together. This will help you avoid getting stuck in the middle of the project. Here is the recommended kit
- Screwdrivers: A flathead and a Phillips screwdriver will suffice for removing end caps and the hardware.
- Drill: If you have a power drill with a screwdriver attachment, this will help you complete the project faster.
- Measuring tape: This will help you ensure the fabric measurements are correct.
- Ladder: Depending on your camper’s height, a ladder (preferably a stable extension type) will allow you to pull the awning.
- Awning Fabric: This should be the right size and length. You can easily buy it online or in RV shops!
- Utility Knife: A simple but effective tool can greatly assist in removing unnecessary fabric during the fabric installation.
- Lubricant Spray: Facilitates part removal and installation.
- Gloves: Needed to mark the locations of the fabric.
Most people overlook the use of high-quality awning fabric. When making an awning fabric, buy one that is waterproof and can sustain ultraviolet exposure. Consider purchasing the fabric from a reputable manufacturer to extend the time between replacements.
Pro Tip: Consider easy-to-clean fabrics with mildew-resistant properties, particularly in areas with high humidity, such as camping regions.
Step 2: Measure the Existing Fabric
The awning fabric size should be appropriately measured. The most important step is correctly taking the awning cloth measurements since not doing this may result in problems during the awning mounting. Sometimes, the fabrics might need more or excess, affecting the awning’s usefulness.
To take such measurements correctly is done in the following manner:
Ensuring the awning’s maximum length
Keep your camping trailer steady. Eventually, relocate the awning from this position and extend it out as thoroughly as possible until it reaches its maximum length. Use measuring tape to get the entire length of the cloth (which does not include the hardware). Most measurements are estimated to fall in the approximate range of 12-21 feet.
Measure the Width
Use tape to measure the width of the awning cloth from the center of the roller tube down the center. Also, measure the distance between rails to get a breath. Typical width ranges between eight and ten feet.
Obtain the Length
Measure the fabric length from top to bottom following the arc of the awning arms replacement parts in the down position.
Fabric dimensions
As you search for a replacement, consider the size of the awning’s fabric. To ensure more precise measurements, use the measurement between the wedged straps instead of measuring the worn wearing.” Below are some basic dimensions for awning fabric:
- 8 x 8 Feet
- 12 x 8 Feet
- 10 x 8 Feet
- 13 x 8 Feet
- 15 x 8 Feet
- 16 x 8 Feet
- 18 x 8 Feet
- 20 x 8 Feet
- 21 x 8 Feet.
Recall to verify your dimensions twice before finally ordering fresh cloth, as you need to do so to save resources. Allow yourself an inch to make necessary adjustments during awning installation.
Common Mistake: Many people need to correct their mistakes, such as measuring the awning arms and ordering the cloth in the wrong size.
Expert Tip: When ordering fresh cloth, it is recommended that the type of material be indicated. The two most common types used are acrylic and vinyl. Acrylic’s breathability makes it very suitable in hot, dry weather, but vinyl is more beneficial for places with a lot of rain.
Step 3:Take down the Old Awning Fabric
Once you have taken measurements, the next task is to cut off the existing fabric. The fabric must be removed if you have to re-clothe an RV awning because the frame is welded to the RV.
It is essential to check the awning frame for corrosion before installing a new fabric cover. Then, all the moving components should be sprayed with lubricant so that the awning’s operation is not hindered.
And if it’s motorized, make sure the power is switched off to avoid unwanted motion. If you want to remove the awning parts, follow these steps:
Remove The End Caps
Begin by using a screwdriver to unscrew the screws used to bolt the end caps in place. These screws should be set aside because they will be required again later.
Remove the fabric from the roller tube
A track system attaches Most fabrics to the roller tube. To prevent harm to the roller, gently pull the fabric away from the track while giving it a soft push.
Remove the spring arm
If the awning is spring-operated and will be deployed over, the type of spring that goes into the awning must be unwound first. The arm has to be dismounted first.
For that, you’ll need to:
- You’re going to locate the small hole in the end cap.
- A pick or screwdriver must be put inside the hole to lock spring tension.
- Remove the bolt holding the arm to the bracket.
- Separate the roller from the arm.
The process of removing the old fabric is simple yet tedious. If you’re dealing with windy conditions, it’s wise to bring an additional pair of hands to support the fabric while you remove it. A potential safety risk would be the awning cloth blown away by a strong wind.
Step 4: Inspect the Awning Hardware Parts
Now that the old fabric has been removed, it is time to check the replacement parts for awnings and hardware. Because of water, snow, or sunlight exposure, mechanical parts such as arms and roller tubes will deteriorate over time. Now, examine such things.:
Check the Area for Rust
If any parts are rusty or rusted, the parts must be mended so that the awning will not malfunction.
Identify any fractures or Bent Components
Broken arms or tubes will directly affect the tension of the awning and its usage.
Verify the Strength of the Springs
Test each spring individually, fixing the weak ones. Tension springs are inside the awning and should be sufficient to keep it taut.
Most importantly, with good planning, you can avoid complications and efficiently use those inbuilt stitches on the new fabric. Changing old hardware will ensure you avoid certain issues in the future and extend the lifespan of new clothes.
Step 5: Place the New awning fabric onto the awning frame
The next step is to install the new awning fabric. The fun begins. It will make the task easier than it is so that the procedure if done solo, is not as complicated as one might think.
Get the Fabric Right Side Up Against the Roller Tube
The fabric must be aligned properly. Starting with one end of the fabric, feed it into the track.
Slip the Fabric into Position
With one hand, feed the cloth into the track and pull it in with the other hand on the opposite side until the end of the cloth reaches the track. This ensures that the fabric remains tight and wrinkle-free.
Reattach the End Caps
Return the end caps to the roller tube when the cloth is fully seated.
Beginner Tip: Do not try pushing it into the track if it bunches or wrinkles, as this is bound to create more problems later. Sagging and uneven tension are likely if the fabric cannot go in smoothly.
Many ask, “How tight do you want the fabric to be?” A tight fit is preferable. However, fully pulling the fabric tight makes it more vulnerable to wrinkles and rips. The fabric must be held at a moderate tension not to appear overly taut.
Step 6: Secure the Fabric in Place
The next stage is fastening the cloth. It includes ensuring that any clamps or screws that could have been used in the cloth are secured and locked so that the fabric does move when in use.
Confirm the Tension
Pull the fabric at an angle on the head-end turn to confirm its position in the track.
Retighten the Screws
If there are screws that have become loose after removing an old cloth, use a screwdriver or drill to retighten them.
The Weave Seam
The distance between the seams of the fabric components on the roller tube and the arms of the awning should be approximately the same.
These steps will protect your awning from ripping, tearing, or flapping about, even on the windiest days, despite the strength and tension of the fabric being doubled. Do, however, avoid over-tightening, as this leads to early wear and tear of the material.
Step 7: Tension the canvas awning cover or loosen the canvas tension
After placing the fabric, tension adjustment ensures that the fabric cap AWNING rolls in and out smoothly. Awning tension refers to the pressure provided so the fabric does not roll unevenly.
Open and Close the Awning
For starters, use your hands to open and close the awning several times to note the cloth’s reactions.
Use the Tension Springs to Make Adjustments
If you feel the extent of the awning fabric is too loose or tight, you can modify these using the tension springs. It is possible to prevent an unsightly surface by adjusting the tension on the springs during the extension of the fabric.
Verify the Awning’s Operation
Make three repetitions of stretching the fabric and then retracting the awning fully extended three times. To ensure that the pulling leads to a smooth roll without catching or sagging in any more sections of the fabric.
Loosen the brackets
To remove the awning fabric from its fabric channel, you must first unscrew the screws holding it in place and the bolts that connect the top and bottom arms. A drill and socket set will be necessary for this task.
Detach the awning tubes
Remove the awning roller tube from its brackets, slide it down the channel, and remove it from the RV after you’ve removed the bolts. Take care not to damage the RV while you remove this tube.
This should be easy for campers. The trick lies in needing a median where the fabric extends taut when stretched out yet pulled back lightly when pulled in. The tension may be too high when the awning is sturdy and difficult to retract.
Step 8: Awning Assessment
After making the necessary adjustments, conducting an extended trial of the product awning is vital as part of its testing phase. Please confirm that these tasks have been accomplished:
Extend and Retract to Test Fabric Movement
The first step is to extend and retract several times. This is done to check how the fabric moves and whether it moves freely.
Make Sure There Is No Slope
The fabric should sneeze when fully stretched. If it appears to be drooping, check for unevenness.
Look for Catches
If a cloth has been caught on a roller tube or in a track, you can start repairing the issue now.
The awning should be operated in changing conditions. Try it in windy weather. This way, tension and changes in the fabric can be easily tested.
Step 9: Final Touches and Cleanup
It is nice to know how to replace awning fabric and how to select it. However, to increase the potential of your new awning, remember to clean it up occasionally. This may depend on how you use it and your RV’s conditions.
However, twice to four times a year should be sufficient for most. The last stage is the completion of the work and the installation of the remaining fittings.
Tighten All Loose Screws
Go around the awning after installing it and tighten the screws that have come loose.
Tidy Up
Gather All Unused Materials and Tools.
Gather your cleaning supplies
To do a complete awning clean. You will require a few pieces of equipment, including :
- Ladder
- Hannover
- A Bucket
- Scrubbing Brush
- Re-sealer
Choose a cleaning agent
Depending on the condition of your awning fabric, choose an appropriate one. You can consider a ready-made cleaning agent, a liquid soap-based cleaning agent that you can prepare yourself, or a special agent for removing tree sap.
Carry out a superficial clean
Remove all the dust and dirt particles from the top and bottom sides of the awning canopy.
Clean the fabric with water
First, wet the fabric with water and then apply a cleaning solution. Then, take a scrub brush and gently clean the dirt with a bit of pressure.
Dispose of Old Fabric
The old fabric should be appropriately disposed of if it cannot be repaired.
Now, repeat the process for the three-stage cloth or at least dry this new cloth completely as well.
Common Issues When Replacing Awning Fabric on Your Own
Some problems arise before, during, or even after replacing a new fabric for a camper awning. Considering that you need these problems to be solved quickly, we have included three common issues together with their respective solutions:
Fabric Does Not Roll Up Tightly First Time
- Issue: An uneven retract of the awning fabric is primarily the problem that some replacement awning fabric camper owners encounter after replacing the fabric. This may lead to the awnings drooping, wrinkling, or being caught up in the roller tube.
- Solution: The main approach to resolving this issue is to use the roller tube as the focus. After you untighten the bolts, you should be able to center the fabric by moving around it. You may adjust the tension on the retractable awning arms on either side of the fabric. Check for bent or misaligned roller tubes and arms and straighten them as necessary.
Fabric Sagging or Loose After Replacement
- Issue: When the new fabric is installed, the stress may not be considered, leading to dramatic sagging if the new awning fabric is not taut enough.
- Solution: Before tightening the fabric onto the roller tube and track, ensure it is stretched entirely without the risk of drooping. In the event of drooping, re-adjust bolts and again pull fabrics tight. Tighten the fabrics by utilizing the tensioners built into the awnings.
Awning Fabric Jamming or Getting Stuck in the Track
- Issue: Some users report that the awning still jams inside the track or becomes stuck while extending or retracting the revolving clamps after changing the cloth. This could occur if dirt prevents movement or the cloth is improperly seated within the track.
- Solution: It is quite apparent that the first step to take is removing the little debris, such as the sheets of paper and other debris, which may have caused the machine to jam. Ensure the cloth is seated correctly on the side tracks and roller tube for installation. If the frame is jammed, which it does if the recalcitrance cloth is moved a little, try moving the fabric a little. You should also straighten out any awkward bends or misalignments that you can see in the tracks.
Be sure to handle these common problems beforehand to ensure your camper awning canvas repair goes well and remains in good condition for years.
Tips for Replacing Camper Awning Fabric Easily

You can enhance the aesthetics and usefulness of your outdoor space by changing the fabric on the camper’s electric awning. To ensure that the replacement is done without battles, here are six reliable tips:
Do Own Research
You should still study how to properly replace the fabric on your RV awning, even if shooting mechanics is not a strain for you.
First, secure the awning (zip ties are a common technique) as you prepare to strip the old canopy off and remove the roller tube to prevent injury.
You can always contact the manufacturer if you want to buy paint or fabric. There is no reason to hustle; there is much to be done.
More so, all that needs to be done should be well thought out and planned. This will safeguard both you and your capital.
Pick Out High-Quality Fabric
Use the best quality fabric to ensure your apparel is dry in any environment. Look for waterproof, UV-resistant materials that can withstand being outside. This will prevent you from bothering yourself with replacing high-quality fabric time and again.
Make a Team or Get Professional Help
When you want to replace the fabric on your RV awning, having a team of 2 to 3 people is always good. Since awnings are so large, it is risky to make one yourself. It will be safer and faster to get an expert.
When there’s someone to assist you, there’s less possibility of an accident or a procedure error. Many people can hold the awning in place, pass the fabric, and easily remove and fix the right RV awning accessories.
Don’t attempt to repair or install your RV yourself if you have no one to support you or the correct tools. Or if you are uncomfortable doing it because the risk of injury to yourself is not worth it.
Follow the Manufacturer’s guidelines
The manufacturer’s directions for awning replacement should be thoroughly read before a leap into the replacement task.
This will provide all the necessary guidance and enable one to avoid all possible accidents.
As a general guideline, try to have a screwdriver, ladder, and a helper whenever needed to perform a project.
Work In Good Weather
It is unsafe, and the fabric is too difficult to manage when the canvas is replaced on a windy or rainy day.
Check Some Worn Out Hardware
Electric awning fabric replacement should be the primary focus. However, evaluating the existing hardware, including the motors and arms, is prudent.
If something is broken or unacceptable, repair it now to prevent it from progressing to where it must be dealt with.
Spray silicone
You can spray silicone on the channels in the tube to help the fabric slide into it.
Do not forget to clean your awnings
Although thorough cleaning procedures should be reserved for once every couple of years, you clean and maintain the awning.
Furthermore, the minimum care needs for the awning may differ depending on the fabric used on the canopy; therefore, clean the awning to the fabric.
Most canopies today are made of acrylic or vinyl. So, before proceeding, it’s essential to have some good ideas about washing your fabric.
Final Overview
Hopefully, you understand now how to replace camper awning fabric. Removing and replacing the old fabric on your camping trailer awning sounds challenging. It is, but anyone following my guide will do it quickly! A proper set-up and professional fixing guarantee the perfect mechanical conditions for the camper awning, which can be expected to last many camping trips ahead.
Always remember that the new awning, or the old one that has been replaced, has its own lifetime, further determined by the fabric and hardware used for construction. Weathering the elements is one thing, but to ensure a longer awning life, use quality material and check the hardware parts.
Have you replaced your camper awning fabric recently? Share your experience or reach out to Awning Sun Diego for professional services!
FAQs
How often should I replace camper awning fabric?
It is reasonable to expect that the covers are changed every five to seven years, but this varies with the weather and other conditions. Wet clothes or covers exposed to direct sunlight often only last a while.
Which type of fabric is best for awnings?
Because of its strength and ultraviolet resistance properties, the Sunbrella fabric has gained immense popularity. Furthermore, the most common material used for camper awning fabric is waterproof vinyl-coated polyester.
How much does it cost to replace RV awning fabric?
The price can range from about $400 to $800, depending on the size and style of the fabric. If you hire someone to do the work, the labor charges can be steep.
What are the signs my camper awning fabric needs replacement?
Examine the material for any indications of deterioration, such as small perforations, fading, or the fabric’s inability to repel water. Install new fabric if the awning canopy becomes slack or can no longer be tight.

