

To build a DIY awning, you first need to choose the Materials, prepare the frame, attach the covering, mark & install wall brackets, mount the awning, test stability & drainage, and do a final inspection & cleaning. But is that really as simple as described? The answer is No.
In that case, today we are going to discuss the step-by-step process on how to build an awning. Not only that, but we will also let you know which awnings you can build by yourself as a non-professional. Moreover, you will also know about some common mistakes that you should avoid during the DIY process.
Key Takeaways
- In DIY awning installation, you may be able to install Polycarbonate Sheet Awnings, Wood Frame Awnings, Fabric Awnings, and fixed awnings.
- For a successful DIY awning installation, you need to measure the right area, choose the Materials, prepare the frame, attach the Covering, Mark & Install the Wall Brackets
- Incorrect Measurements, Wrong Materials, weak wall strength, Improper slope, Poor Bracket Installation, and Wrong Fasteners are the most common issues for DIY awnings.
Which Types of Awnings Can You Build DIY?
As an unskilled person, you can build Fixed, Fabric Awnings (Manual), Wood Frame Awnings, Polycarbonate Sheet Awnings for Windows, and Doors. So, if you want to set up the mentioned awnings by yourself in dedicated places, then you can do it yourself.
Otherwise, for bigger spaces like decks, outdoor dining areas, pool sides, or garden areas, you need a professional awning installation service provider. Now, take a look below and know why you can build yourself only those mentioned awnings.
Fixed Awnings
Well, we recommend this if you are a total amateur. Due to no mechanical parts, fewer components, and an easy installation process, this one is the best awning that you can easily do yourself. This awning is best for doors, windows, and patios with a variety of materials like aluminum or wood frames with canvas or metal covers.
Fabric Awnings (Manual)
Ok, so why have we mentioned the manual? We mentioned the manual because there are differences between motorized and manual awnings; if you choose the manual option, it is easy to install. But if you prefer the motorized version, you should contact a professional like Awnings San Diego for assistance. These awnings are best for Small patios, doors, and windows.
Wood Frame Awnings
This awning is good for people who have basic carpentry skills. However, wood frame awnings are DIY friendly due to easy cutting, available materials, and no special tools required, which is why this one is good as a DIY awning. Well, a wood frame awning is suitable for patios and outdoor seating areas.
Polycarbonate Sheet Awnings
Due to lightweight, pre-cut sheets, you can build DIY Polycarbonate Sheet Awnings. These awnings are very hard and strong, which can protect against heavy rain and harsh sun. Polycarbonate Sheet Awnings are best for doors and windows.
Note: You should never try to set up awnings like motorized retractable, large commercial, or heavy steel types. This is because these awnings require expert installation with advanced tools.
What Tools do you require for a DIY build awning?
For DIY-Awning, you need 4 categories of tools, including drilling & fastening tools, assembly & holding tools, fabric & covering tools, and safety equipment. All these tools are available in the nearest hardware store. In fact, before purchasing them, take a look at your store; maybe some of them are already available there.
| Drilling & Fastening Tools | Assembly & Holding Tools | Fabric & Covering Tools | Safety Equipment | Optional |
| Electric Drill | Hammer | Staple Gun | Safety Gloves | Stud Finder |
| Drill Bits (Wood/Metal/Masonry) | Clamps | Staples | Safety Goggles | Angle Grinder |
| Screwdriver Set | Ladder / Step Ladder | Screws with Washers | Dust Mask | Silicone Sealant Gun |
| Socket Wrench / Spanner | Work Table / Flat Surface | Hard Hat (Optional) | Paintbrush / Roller | |
| Wall Anchors |
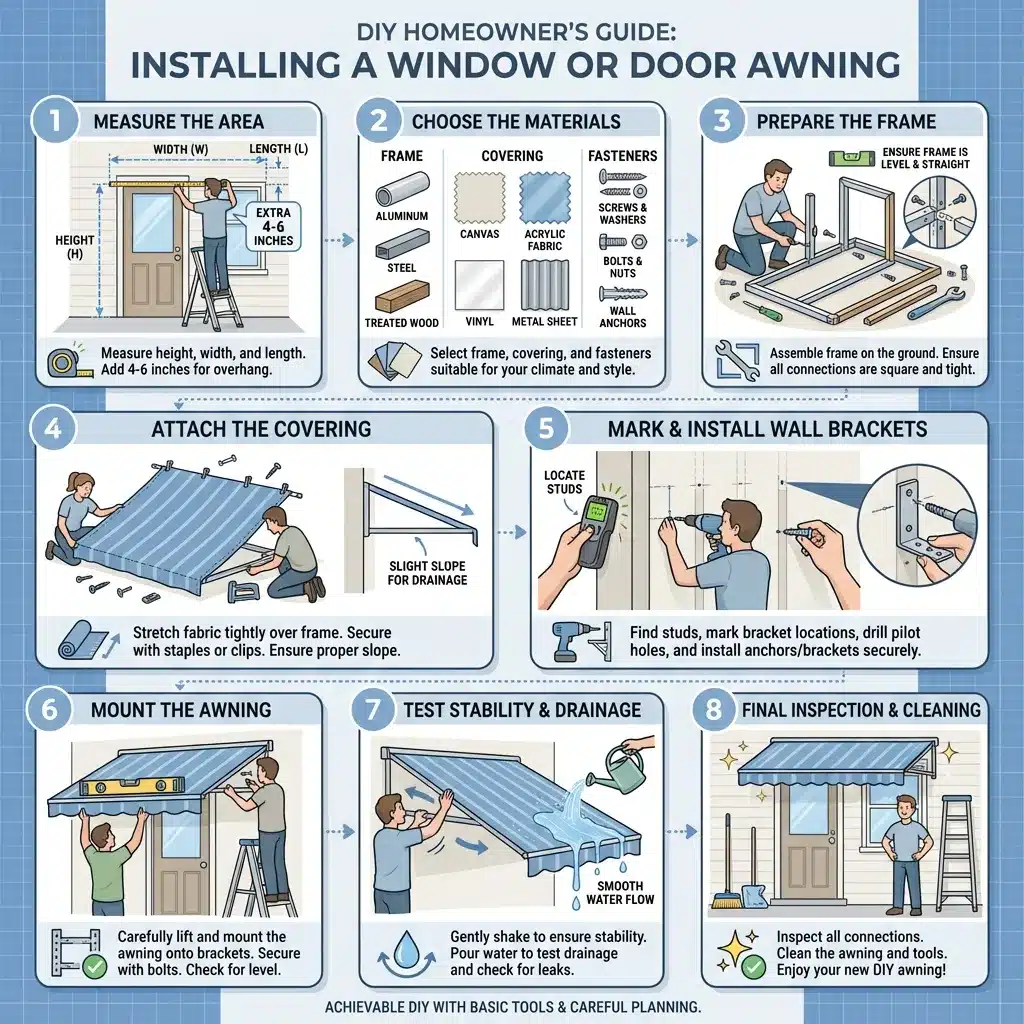
8 Step-by-Step Processes to Build Your Own Awning
This is very simple; you need to pay attention to the process, so be careful. However, before starting the process, make sure you follow the local Homeowners Association (HOA) rules and regulations. Now, take a look below and know more about the process.
Step 1: Measure the Area
First, you need to measure the area; in that case, you need to mark the height, width, and length properly. After the measurement, add some extra coverage, around 4 to 6 inches for safety. Double-check the measurement and verify that it is correctly calculated.
Step 2: Choose the Materials
Now, based on your location, you need to choose the best materials for the awning. For the frame of your DIY awning, you can use aluminum, steel, or treated wood, and for the covering, canvas, acrylic fabric, vinyl, or metal sheets will work well. After that, fasten them with Screws, bolts, or wall anchors very tightly.
Step 3: Prepare the Frame
Now it’s time to prepare the frame; you need to cut the materials into pieces, but be careful. After that, join all the parts with screws or bolts. Test it by putting pressure on it before setting it. Keep a close look and make sure it is straight and steady according to the calculation.
Step 4: Attach the Covering
This is an important stage of this DIY Awning process. It will be better if you take someone’s assistance from here. Now hold the fabric and stretch it over the frame, and secure it with staples, screws, or clips. Make sure there are no wrinkles or loose areas there. Ok, at this stage, you need to put a small slope for water drainage.
Step 5: Mark & Install Wall Brackets
At this point, half of our task is complete; you need to mark the wall bracket and ensure that the area is safe, as failing to do so could result in injury. It will be better if you use a stud finder to detect old wires and other elements. After that, drill the hole at the marked points and insert the wall anchors, and then tighten them properly.
Step 6: Mount the Awning
Now, you need to mount the awning to the brackets; for this step, you can take someone’s assistance, which will keep it balanced and level. After that, secure the awning and make sure you lock it up properly. Try to give the accurate shape at once, but if needed, then you can adjust the angle.
Step 7: Test Stability and Drainage
Ok, now it’s time to check the 2 most important things, which are stability and drainage. At this stage, first shake the awning gently and then pour a little water to check that the drainage is working correctly.
Step 8: Final Inspection and Cleaning
After finishing all the tasks, go through to a final inspection, tighten all the screws, and clean the awning. If you have selected foldable awnings, then make sure they open and close correctly.
Why should you build your own Awning?
If you build your own awning, then you can save some money, allow you to have a custom design, learn new skills, and have a flexible budget. Well, DIY Awning installation has a lot of benefits, but still, we are saying again that if you are not confident, then don’t try. Now, have a look below and know what benefits you will get from a DIY Awning.
- It will Save Money
- You can customise your own awning design
- Better Quality Control
- You can adapt a new skill
- It will be easy to repair and maintain in the future
- You can do it with a flexible budget
- Personal Satisfaction of Completion
Common Mistakes to Avoid During DIY Building of an Awning
The most common mistakes during DIY awning building include incorrect measurement, choosing the wrong material, not checking wall strength, ignoring proper slope, poor bracket installation, using the wrong fasteners, and building too large for a DIY awning. These mistakes can ruin all of their hard work and money at once. So, in that case, you should be more careful about them.
- Incorrect Measurements
- Choosing the Wrong Materials
- Not Checking Wall Strength
- Ignoring Proper Slope
- Poor Bracket Installation
- Using the Wrong Fasteners
- Overstretching or Loose Fabric
- Skipping Safety Gear
- Awning Building is Too Large for DIY
FAQs
What is the best fabric for an awning?
Due to its mildew control, UV resistance, durability, and ease of maintenance, polyester fabric is the best fabric for an awning.
What is the lifespan of an awning?
On average, the life span of an awning is around 8–10 years. Well, the lifespan depends on the use and maintenance level.
Do awnings reduce heat?
Awnings will reduce and block the solar radiation up to 77%. This blockage helps to keep the inner side cool and saves a lot of energy.
Think twice before DIY-building an awning
Till now, we have shared all the processes on how to build an Awning. Well, the steps are simple to perform, but if any mistake is made, then the money and time will all be wasted. So before making any decision, please think about this again. If you need any assistance from us, feel free to contact us.


